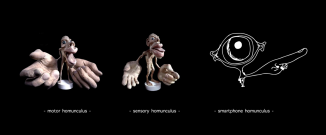
What is the smartphone homunculus?
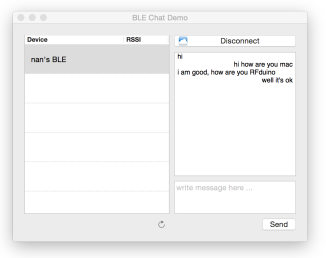
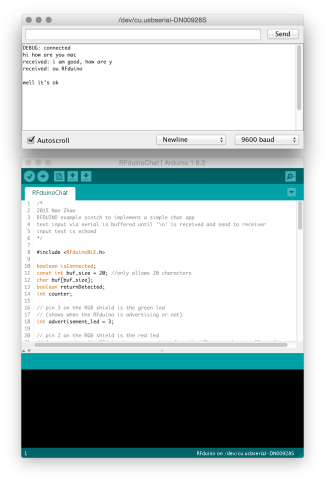
I made a simple app that let you chat between the RFduino BLE development platform and Macbook. This is my first project in Cocoa programming. It helped me to understand the mechanisms behind CoreBluetooth and how to interface with the RFduino. Maybe it is helpful for you as a reference on developing for the RFduino and CoreBluetooth.
> check out the project on github
This software is based on Apple Developer’s Heart Rate Monitor Example. I have not incorporated recent changes in CoreBluetooth (iOS7). Also interesting, this tutorial by the RFduino Team shows how to use the Nordic SDK with RFduino.
As part of the MIT Media Lab Directors Fellow Program I traveled to Nairobi, Kenya in 2014 with my PhD adviser, Joe Paradiso and a team of students to conduct a workshop on “sensing in the wild”. As part of this workshop we discussed how sensor networks could support Wildlife Work‘s effort to prevent poaching. The workshop started at iHub, a technology community and innovation center in Nairobi. Together with local entrepreneurs and researchers we brainstormed ideas and drafted experiments. Later we visited Wildlife Work in Tsavo National Park and field-tested some of the ideas that we have previously developed, partially using sensor technology we brought along and some we build on site. During our short two day visit at Tsavo one elephant was killed for it’s tusks. This is the sad reality that the brave men and women working at Tsavo have to face everyday. The protection of the elephants is a difficult and dangerous task.
As an exercise we sonified activity and sound data that we collected at a watering hole. In the example below the amplitude level determines the pitch of sound:

MIT Media Lab Director’s Fellows Offsite in Nairobi from Juliana Rotich on Vimeo.

Photographs by Colin Raney
Having conducted workshops previously in India and China, this time I am invited to work with researchers and entrepreneurs from the middle east region. Also in this workshop we followed the framework: observation, reflection and innovation. See the video below to learn more about the activities and outcome of the workshop.
In this interview Joe Paradiso explains the goals and ideas of the workshop.
Video by Wamda.
https://www.flickr.com/photos/nanzhao/albums/72157644054213416
This term I am teaching a module class (MAS.500f) on Applied Controls.
This module will give students an introduction to basic control theory. We will use a classic example in dynamics and control, the inverted pendulum (or self balancing car), to demonstrate the capabilities and limits of different control solutions. We will also provide an overview of modern control methods, and line up a few guest talks from people using control in different ways for interesting applications. Guest lectures include
Find more information and course material here.
In fall 2012 I was invited to the 2012 “Interactive Design” —— Experimental Application Workshop at Shanghai University of Fine Arts. This webpage give a short in production to the workshop and shows the work my group (group 2) accomplished during this workshop. More information about the workshop and participants can be found here.

The theme of the workshop was to create a location based application. During the past week the students were exposed to a unique design process that guided them through the development of an application concept.
The students’ personal interests and their concerns were the starting point. We found three main areas of interests and followed the IDEO brainstorming guidelines to generate a pool of Ideas. Using seven evaluation criteria we identified the most outstanding idea. An early concept evaluation was performed during a short field trip in Gucun Park.
In the creation phase the students experienced the process of application development from function definition to logo design. Furthermore they learned an open source programming language called Processing. They developed their ability in data visualization and interactive application design.
Ripple from Nan Zhao on Vimeo. If the video does not play click here.
The application, Ripple, is inspired by our manifold experiences in our environment. The same places create different feelings in us depending on where we came from and where we are going, depending on our emotional state and our intention. Different things in our environment catch our attention and define our relationship to the location. We want to capture and share these moments. Ripple let us retain this impression and the dynamic of our environment and let us immerge into it at a different time and from a different point of view.
Using our smart phone as a paintbrush and sound, photos, and motion as our palette we designed an algorithm to generate an Art Map. While we move though our environment we leave behind trails that become lines on the canvas. The pictures and sounds we capture become ripples that spread over the Art Map, which symbolizes the way information distributes and impacts our surroundings.
More information about the functionalities of the Application can be found in the image below.
The Art Map from Nan Zhao on Vimeo. If the video does not play click here.


The Media Lab India Initiative started as a student effort to encourage exchange of ideas about technology, design thinking, and entrepreneurship between MIT and universities in India. This initiative later became an annual event with hundreds of applicants. For the second annual Media Lab India Workshop I traveled to New Delhi to lead the Sensor Mediated Environments Track. Together with Nan-Wei Gong we worked closely with local students and teachers to develop new strategies in creating intuitive, customizable interfaces for human-computer interaction. We enjoyed the fun of prototyping and going through the creative process with our participants. Click here for more information about the workshop.
The following video captures my more general impression of India during our adventure.
Use arduino and processing to view sensor input from two FSRs.
components:
schematics:

setup:
1) install Arduino: follow the instructions here
2) upload the following code
int sensorPin_front = A0; // A0 is the input pin for front fsr
int sensorPin_back = A1; // A1 is the input pin for back fsr

int sensorValue_front = 0; // variable to store the value coming from the sensor
int sensorValue_back = 0;

void setup() {
// initialize serial:
Serial.begin(115200);
// declare the ledPin as an OUTPUT:
pinMode(ledPin, OUTPUT);
}

void loop() {
// read the value from the sensor:
sensorValue_front = analogRead(sensorPin_front);
sensorValue_back = analogRead(sensorPin_back);

//send over serial
Serial.write( 0xff); //control byte
Serial.write( (sensorValue_front >> 8) & 0xff); //first byte
Serial.write( sensorValue_front & 0xff); //second byte
Serial.write( 0xfe);
Serial.write( (sensorValue_back >> 8) & 0xff);
Serial.write( sensorValue_back & 0xff);
//delay(100);
}
or download file here
3) install Processing from here
4) I used this example and modified the code for this purpose. download modified code here. Change the com port to the com port that the arduino is connected to.
5) if pressure is applied you should see the following

In this article I am going to describe how to set up an RF wireless network with XBee modules and the Teensy USB development board.
Teensy is a fairly well documented and easy to use development board. In this example I am using Teensy 2.0. Two good things about Teensy are that it has an USB serial port and an additional serial port that supports UART. This way you can easily connect Teensy to the XBee module using serial connection and still be able to debug and communicate with Teensy using the USB serial port. Another good thing about Teensy is that you can use a simple hardware modification to make it run with 3.3V, which is the supply voltage for the XBee module.
you can follow these instructions to get started with Teensy and then follow this instruction to setup Teensyduino, which let you easily program Teensy using the Arduino platform and Arduino libraries.
There are two XBee operation modes, transparent operation and API operation. Transparent Operation is easier to get started with, it acts as a replacement of the serial communication. You set a fix destination address, this means that this XBee modul will only talk to the XBee module in its network that has this specific destination address as my address. You can also broadcast to every module in the network by setting the destination address to ffff. When the module receives an RF packet, the data is sent out the DO pin with no additional information. API operation requires that communication with the module be done through a structured interface. Using API operation you are able to transmit data to multiple destinations without entering Command mode, get receive success and failure status, and identify the source address of the received package. The different package structures can be found in the data sheet 3.4.1 API Frame Specifications. We are using Series 1 XBee modules.
